
Safety Instructions
• Explosive gases may escape from the battery during charging. Prevent flames and sparks. Provide adequate ventilation.
• Before charging, read the instructions.
• For indoor use. Do not expose to rain.
• Make sure a charger is for AGM-VRLA batteries or Li-ion batteries before use and find a right charger for a battery from the size and
voltage specified in the specifications table).
• Disconnect the before making or breaking the connections t city power o the battery.
• The battery charger must be plugged into an earthed socket-outlet.
• Connection to supply mains is to be in accordance with National wiring rules.
• Do not attempt to charge non-rechargeable batteries.
• Never charge a frozen battery.
• If AC cord is damaged, do not attempt to use. It must be repaired by a qualified person.
• Corrosive substances may escape from the battery during charging and damage delicate surfaces. Store and charge in a suitable area.
• Ensure all vehicle accessories including lights, heaters, appliances etc are turned off prior to charging.
• This charger is not intended for use by persons (including children) with reduced physical, sensory or mental capabilities, or lack of
experience and knowledge, unless they have been given supervision or instruction concerning use of the appliance by a person responsible
for their safety.
• Young children should be supervised to ensure that they do not play with the appliance.
• Do not put or drop a metal tool on a battery. The resulting spark or short-circuit on the battery will cause explosion.
• Remove personal metal items such as rings, bracelets, necklaces, and watches when working with a battery. A battery produces a short-
circuit current high enough to weld any metal objects and will cause a severe burn.
• There are high temperature and high pressure inside the product, and only trained and qualified professionals can install, operate and
maintain this battery charger.
• In the installation, operation and maintenance of the equipment, the local safety regulations and relevant operating procedures must be
observed, otherwise personal injury or equipment damage may result.
• The manufacturer is not responsible for any personal injury or equipment damage caused by violation of general safety operation
requirements or violations of safety standards for design, production and use of equipment.
Product Description
Our smart charger is specially designed with 8-stage charge and it has many of the protective including battery misconnection (wrong voltage), reverse polarity, battery disconnection or not connected, and battery failure analysis. The latest high efficiency switching topology and micro controller power management are utilized in its design. Charging rate/type selection can be easily done by a user through the selection switch on the front panel. Against different types of batteries, such as AGM-VRLA, SLI, LiFePO4 and Gel, a battery may require special charging curves and adjustment to the protective functions which differs from the standard settings. The charging curves and protective functions can be customized by re-programing its firmware. Please note that our charging curve is for charging lead-acid battery. Please contact Koyosonic if you need to charge other types of batteries.
Assembly Guidelines
1. A charger should be turned OFF before battery connection. Suitable wire gauge should be chosen based on rated charging current of a charger unit. Double-check battery polarity before making the battery connection. Positive terminal of the charger must be connected
to "+"of a battery and negative terminal to "-" of the battery. Also, make sure the positive and negative terminals of the charger are not accidentally shorted together.
2. After plugged in AC power, turn ON/ OFF (0/-) switch to the ON (-) position. The LED indicator on the switch is lighting.
Charging Battery-Connection
1. Charging a battery within the devices
1) Ensure the AC power lead is disconnected from the AC mains supply before connecting.
2) Charging a negatively grounded (earth) battery. Connect the red (+) battery clip to the red (+) post on the battery. Connect the black (-) battery clip to the vehicle chassis, away from the battery and fuel line as designated in vehicle handbook.
2. Charging a battery removed from the devices
1) Ensure the AC power lead is disconnected from the AC mains supply before connecting
2) Connect the red (+) battery clip to the red (+) post on the battery and connect the black (-) battery clip to the black (-) post on the battery.
Charging Battery-Operation
1. Ensure a Smart Charger is connected safely and correctly to a battery.
2. Connect the AC power lead to the AC power supply. Turn on 'ON/OFF' switch.
3. When charging is finished, the 'Fully Charged' icons of the LCD will light up.
4. The Smart Charger can be left safely connected to a battery for an indefinite period.
5.To disconnect the AC plug from the AC mains supply.
6.Turn off 'ON/OFF switch. Remove the red (+) clip from the battery and then the black (-) clip.
8-Stage Automatic Charging
1. This is a fully automatic battery charger with 8 charge stages.
2. Automatic charging protects your battery from being overcharged so you can leave the charger connected to the battery indefinitely.
3. The 8-stage charging is a very comprehensive and accurate charging technique that gives your battery longer life and better performance
compared to using traditional chargers.
4. Koyosonic Smart chargers can be adjusted to suit a number of different battery types including GEL, AGM, WET and Calcium. The chargers
can also help restore drained and sulphated batteries.
5.The 8charge stages are:
Desulphation; Soft Start; Bulk; Absorption; Equalization, Analysis; Recondition and Float.

Charging Battery-Operation
1. DESULPHATION
The Desulphation stage is designed to break down sulphation occurring in batteries that have been left flat for extended periods of time,
returning them back to full charge. Sulphation occurs when leadsulphate hardens and clogs up the battery cells.SOFT STARTThis is a
preliminary charge process that gently introduces power to the battery, protecting the battery and increasing battery life.
2. SOFT START
This is a preliminary charge process that gently introduces power to the battery, protecting the battery and increasing battery life.
3. BULK (CONSTANT CURRENT)
The Bulk stage reduces charging time by charging the battery at the maximum rate (constant current) to a set voltage, at which point the
battery is approximately 80% charged.
4. ABSORPTION (CONSTANT VOLTAGE)
The absorption stage charges the battery to 100% by adjusting the charge rate allowing the battery to absorb more power.
5. EQUALIZATION (CALCIUM MODE ONLY)
Designed especially for calcium batteries, this stage returns calcium batteries to full service by removing acid stratification of the
electrolyte.
6. ANALYSIS
The analysis mode tests the battery to ensure that it has taken the charge; if the battery passes the test the charger will proceed to the float stage, but if the battery fails the test, the charger will apply a recondition charge to try to return the battery to full charge.
7. RECONDITION
If after charging, the battery is unable to hold the charge the battery reconditioning function is initiated automatically. This is most likely to
take place on batteries that have been deeply discharged, prior to charging. The Recondition mode will then run for 4 hours and at the end
will retest the battery. The Smart battery charger will perform the recondition charge up to 3 times before switching the charging
cycle to Float with an error indication.
8. FLOAT
The Float stage maintains the battery at 100% charge without overcharging or damaging the battery. This means the charger can be left
connected to the battery indefinitely.
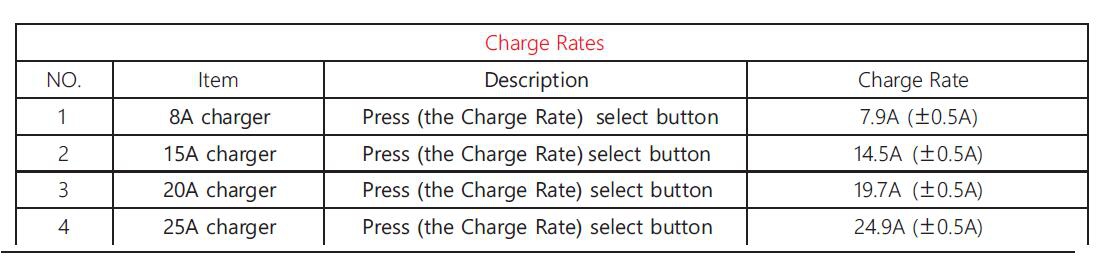
Charging Rates
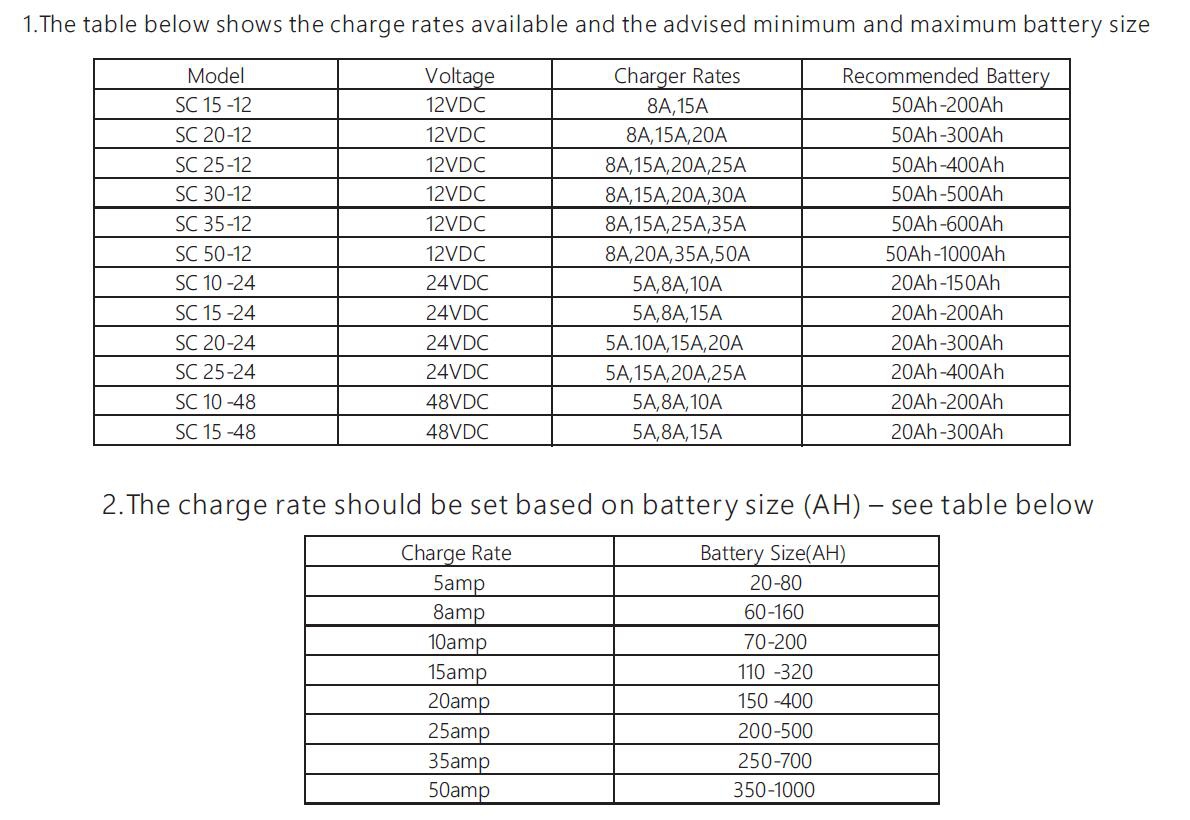
1. To select the desired charge rates, please press the 'main', 'up', 'down' select button until the desired charge rate is displayed. The Smart
Charger retains the default setting when first connected.The charge rate should be set based on battery size (AH) – see the table below:
2. Press the main select switch – the LCD screen will flash the previous setting.
3. Press the up and down switch repeatedly until the required charge rate is set.
LCD Display
The LCD display on the Smart Charger can display the following information:
- Battery voltage (V)
- Charging current applied (A)
- Battery type: Gel, AGM, Wet (lead acid) and Calcium.
- Battery charging / Charged icon
•- Recondition / Equalization modes
Battery Chemistry Selction
The multi-chemistry function allows you to set the optimum charging profile to suit each battery chemistry type: Gel, AGM, Lead Acid (WET) and calcium. This ensures correct and thorough charging and maximizes battery performance and battery life.
-Gel battery: Designed for Gel batteries and applies a m -Gel battery: aximum charge of 14.1V
-AGM battery: Designed for AGM batteries and applies a maximum charge of 14.4V
-Lead Acid (Wet) battery: Bulk and absorption 14.7V, recondition up to 15.9V
-MF Calcium battery: Bulk and absorption 14.7V, Equalization and Recondition up to 15.9V
Set Battery Chemistry Type
1. After the Smart Charger connected to the AC mains supply, press the 'main' button until the battery type flashing.
2. Press the 'up' and 'down' button repeatedly until the correct battery type is selected.
Manual Reconditioning
1. Reconditioning can recover a battery from a deeply discharged state by equalizing the battery cells to improve battery performance
allowing the battery to operate at full capacity. It is advised that periodically a manual Recondition charge should be carried out
to optimize a batteries health and performance.
2. It is advised that for batteries where the electrolyte level needs checking and maintaining the manual reconditioning process takes place with the battery removed from the vehicle.
3. Press the Manual Recondition button. The Smart Charger will remain in this mode.
4. During Reconditioning the LCD will flash. On completion of the Recondition stage, the charger will then start a normal charging cycle.
Mounting Instructions
The Smart Charger must be placed in a dry and well-ventilated place. Ensure there is at least 10cm clearance from the end plates to allow adequate ventilation for the cooling fan. Do not cover the charger and keep clean and free of dust. For permanent connection it is
advised to connect to the battery terminals with a ring terminal connection. Ensure all sensor wires which run parallel to both positive and negative cables are also connected.
Function Description
1. Input voltage
- Input voltage range is 90~132Vac or 198~264Vac
- The provided input voltage must fall within the specified range ,otherwise the unit maybe non-functional, also the active PFC circuit may fail
or get damaged.
2. PFC
- Built- in active PFC circuit: PF>0.95 when input voltage is between 90~132Vac or 198~264Vac with full load at the output. On the other
hand, if the input voltage is >230V or output is not in full load, the PF will drop below 0.95.
3. Reverse polarity protection
With built-in battery reverse polarity detection circuit. When the battery is connected in reverse at the output terminal of the charger, the output diode will be broken to protected the charger.
4. Fan control
With built-in fan speed control circuit, the fan will automatically change speed depending on load condition.
5.Temperature compensation
Temperature sensor which comes with the charger can be connected to the unit to allow temperature compensation of the charging
voltage.If the temperature sensor is not used, the charger can still work normally.
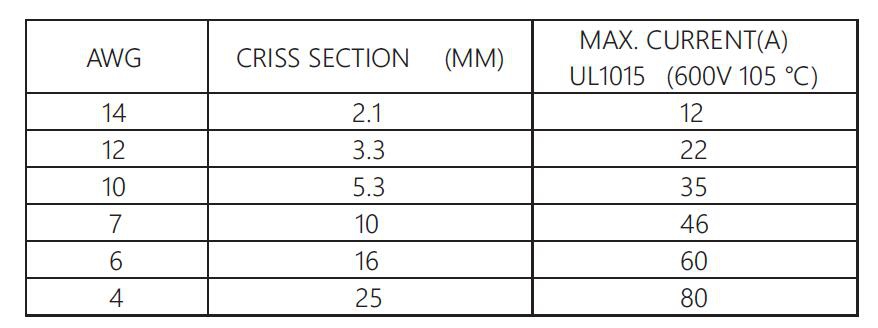
6.Wiring for battery
Select suitable wire based on rated charging current. Refer to the following table for minimum wire gauge. We highly recommend using
RED wire for "+" connection, and BLACK wire for "-" connection.
Technical Parameters
Based on power of a battery, the different charge stages could be automatically selected by the charger. In order to avoid being over-charged or under-charged, the charging current and voltage is different at different charge stages.
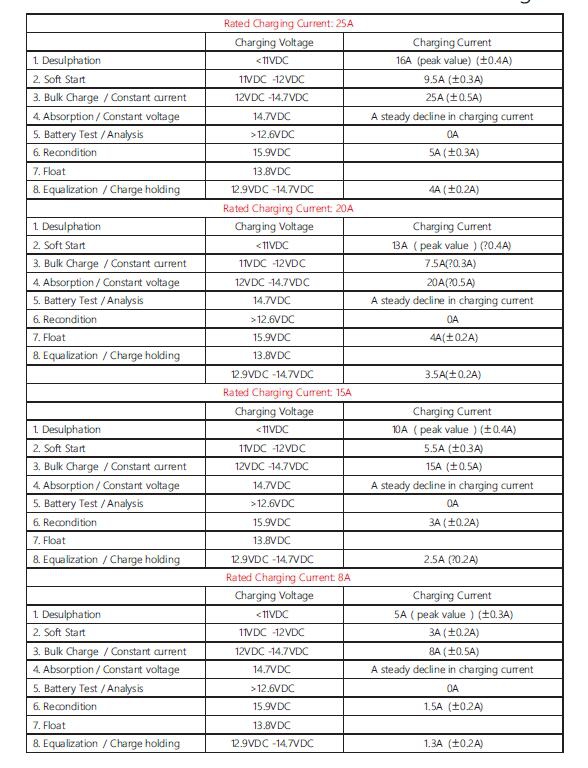
Charge Rates
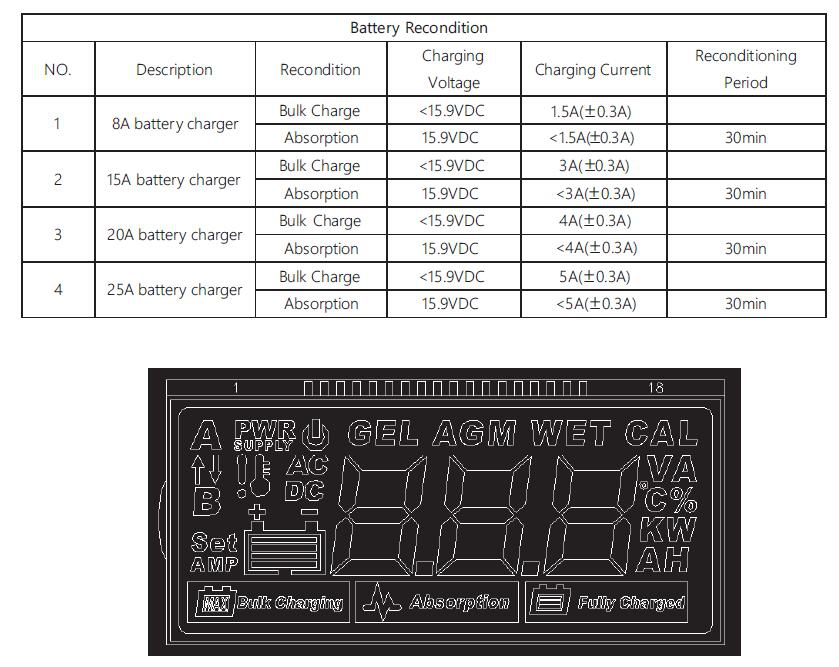
Battery Recondition
For a battery with little sulphation, the Smart Charger has the function of recondition. After the battery is charged fully, the battery will be recharged at a high voltage by the smart charger. The lead sulphate particles are reduced to recover the battery.